Homemade Kimchi Recipe
Create your own tangy and spicy homemade kimchi with this easy-to-follow recipe. Perfect for your Korean cuisine cravings!
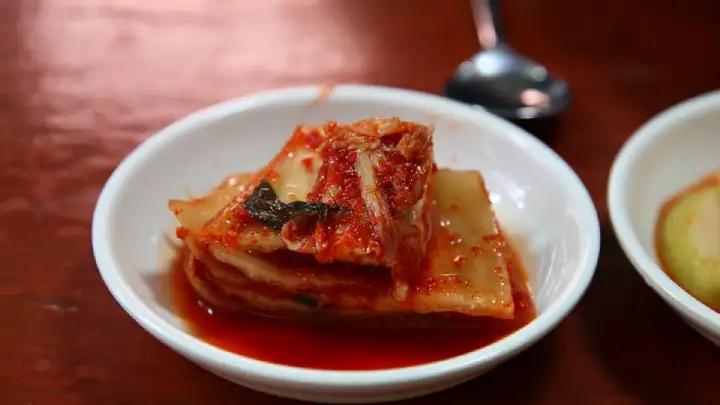
Table of Content
Traditional Korean Kimchi
Click here to see more portionsKimchi is far more than a side dish in Korea—it's a cornerstone of national identity, a fermented vegetable preparation so central to daily life that most Korean households still make their own batches, often using family recipes passed down through generations of women. While the practice of preserving vegetables through salting and fermentation in Korea dates back over a thousand years, the fiery red kimchi most people recognize today only emerged after chili peppers arrived from the Americas via Portuguese and Japanese traders in the 16th and 17th centuries, transforming what had been a milder, often white or lightly seasoned preparation. This recipe focuses on baechu kimchi, made from napa cabbage, the most iconic and widely eaten variety among hundreds of regional kimchi types found across the Korean peninsula. The process relies on a careful balance of science and tradition: salt draws moisture out of the cabbage and creates an environment hostile to harmful bacteria while welcoming the beneficial lactic acid bacteria responsible for fermentation, the chili paste and aromatics provide flavor and additional preservative qualities, and time does the rest, slowly transforming crisp, salty cabbage into something tangy, complex, and alive with beneficial bacteria. Kimchi's importance to Korean culture runs so deep that South Korea maintains a national kimchi research institute, and the practice of communal kimchi-making, known as kimjang, was recognized by UNESCO as part of humanity's Intangible Cultural Heritage.
| Ingredient | Amount |
|---|---|
| For Salting the Vegetables: | |
| Napa Cabbage | 1 head (about 1.5-2kg, quartered) |
| Sea Salt | 40g (coarse, divided for salting and paste) |
| Korean Radish | 200g (peeled, cut into thin matchsticks) |
| For the Kimchi Paste: | |
| Garlic Cloves | 5 cloves (minced or pureed) |
| Ginger | 30g (peeled, grated or pureed) |
| Korean Red Pepper Flakes | 50g (gochugaru, coarse grind) |
| Fish Sauce | 60ml (or salted shrimp, for umami depth) |
Instructions:
1. Cut and Prepare the Cabbage:
Remove any wilted or damaged outer leaves from the napa cabbage, then cut it lengthwise into quarters, cutting only partway through the core and pulling the rest apart by hand—this traditional method keeps the leaves more intact than slicing all the way through. Rinse each quarter under cold running water, separating the leaves slightly so water reaches into the layers and removes any dirt or grit hiding near the base.
2. Salt the Cabbage Thoroughly:
Sprinkle coarse sea salt generously between every leaf layer of each cabbage quarter, paying special attention to the thicker white stem portions, which need more salt than the leafy green tips since they're denser and slower to soften. Place the salted cabbage in a large bowl or basin, cut sides up, and let it sit at room temperature for 2-3 hours, flipping the quarters halfway through so they salt evenly. The salt draws out excess water and begins softening the tough cabbage fibers, which is essential both for texture and for creating the right environment for fermentation.
3. Rinse and Drain the Cabbage:
Once the cabbage has wilted and the thickest stem parts bend easily without snapping, rinse each quarter under cold running water two to three times to remove the excess surface salt. Taste a small piece of the stem; it should taste pleasantly salty but not overwhelmingly so. Place the rinsed quarters in a colander and let them drain thoroughly for at least 30-60 minutes, pressing gently occasionally to release trapped water, since excess moisture will dilute your paste and make the kimchi watery.
4. Prepare the Radish:
While the cabbage drains, peel the Korean radish and cut it into thin matchsticks roughly 4-5cm long. Korean radish (mu) is firmer, sweeter, and less peppery than common varieties like daikon, but daikon works as a reasonable substitute if Korean radish isn't available. These radish strips add a satisfying crunch and subtle sweetness that contrasts nicely with the softer, more pliable cabbage leaves once everything ferments together.
5. Build the Kimchi Paste:
In a large mixing bowl, combine the minced garlic, grated ginger, Korean red pepper flakes (gochugaru), and fish sauce. Mix thoroughly into a thick, vivid red paste. The gochugaru provides color and a fruity, only moderately spicy heat very different from cayenne or chili powder, while the fish sauce contributes deep, savory umami that becomes more complex and rounded as fermentation progresses. Taste the paste carefully—it should taste intensely savory, garlicky, and spicy, since this concentrated flavor needs to season the entire batch of cabbage once mixed in.
6. Combine Radish with the Paste:
Add the prepared radish matchsticks to the bowl of kimchi paste and mix well using a spoon or, more traditionally, gloved hands, making sure every strip of radish gets thoroughly coated. Wearing food-safe gloves is genuinely recommended here, since the gochugaru and garlic mixture can irritate skin and will stain your hands a vivid red-orange that takes time to fade.
7. Massage the Paste into the Cabbage:
Working with one cabbage quarter at a time, separate the leaves gently and spread the radish-paste mixture between every layer, working it all the way down to the base of the stem where flavor needs to penetrate just as much as at the leafy tips. Rub and massage the paste into each leaf with your hands, ensuring thorough, even coverage—this hands-on application is what makes homemade kimchi taste so much more vibrant than versions where the paste sits mostly on the surface.
8. Pack into a Fermentation Vessel:
Fold or roll each coated cabbage quarter into a compact bundle and pack it tightly into a clean glass jar or traditional fermentation crock, pressing down firmly as you go to eliminate air pockets and encourage the cabbage to release liquid that will eventually submerge it. Leave at least 3-5cm of headspace at the top of the jar, since the kimchi will expand and release gas as fermentation gets underway, and seal the container, but not so airtight that pressure can't escape if needed.
9. Ferment, Then Refrigerate:
Let the packed kimchi sit at room temperature for 1-2 days, checking it daily; you should see small bubbles forming and notice a pleasantly tangy aroma developing as fermentation activates, and it's wise to briefly open the lid once a day to release built-up gas. Once it smells appropriately sour and you can see active bubbling, transfer the jar to the refrigerator, where fermentation continues much more slowly, allowing the flavor to keep deepening and mellowing over the following weeks. Serve chilled as a side dish, or use it in soups, fried rice, and pancakes once it's matured to a more pronounced tang.
Kitchen Wisdom & Korean Fermentation Traditions:
- Salt Properly, Not Just Generously: Under-salted cabbage stays too crisp and watery, while over-salted cabbage becomes unpleasantly briny—rinse thoroughly and taste-test the stem before moving forward.
- Gochugaru is Not Interchangeable: Korean red pepper flakes have a uniquely fruity, moderate heat that cayenne or standard chili powder simply can't replicate—seek out authentic gochugaru for proper flavor and color.
- Massage the Paste In, Don't Just Layer It: Hands-on application between every leaf, all the way to the base, produces far more evenly flavored kimchi than simply spreading paste on the surface.
- Wear Gloves: Gochugaru and raw garlic can irritate skin during extended contact, and the paste stains hands for days—disposable gloves make the process much more pleasant.
- Leave Room for Expansion: Fermentation produces gas, and tightly sealed, fully packed jars can build dangerous pressure or overflow—always leave headspace.
- Vent the Jar Daily: Briefly opening the lid once a day during the active room-temperature fermentation phase releases pressure and prevents overflow or off-flavors.
- Taste as it Ferments: Kimchi's flavor evolves daily—taste periodically to find the level of tang you personally prefer, then move it to the fridge to slow things down.
- Cold Storage Doesn't Stop Fermentation: Refrigeration slows the process dramatically but doesn't halt it entirely, which is why kimchi keeps developing flavor for weeks or even months.
- Older Kimchi Has Its Uses: Very well-fermented, sour kimchi might be too intense eaten plain, but it shines in cooked dishes like kimchi jjigae (stew) or kimchi fried rice.
- Consistency Comes with Practice: Salting time, fermentation speed, and final flavor vary with kitchen temperature and cabbage moisture—don't be discouraged if your first batch differs from the next.
Korean Heritage & Kimjang Culture
Fermented vegetable preservation in Korea stretches back well over a thousand years, born from the practical need to store vegetables through harsh winters when fresh produce was unavailable, but kimchi as it's recognized today—bright red and chili-forward—only took shape after chili peppers reached the Korean peninsula in the 16th and 17th centuries through Portuguese and Japanese trade contact. Before that, early kimchi varieties were typically milder, often relying on salt brine alone or other seasonings entirely. Kimjang, the centuries-old communal tradition of families and neighbors gathering each autumn to prepare enormous batches of kimchi to last through the winter months, remains an important social ritual in Korea even today, and UNESCO recognized this practice as part of humanity's Intangible Cultural Heritage in 2013, citing its role in strengthening community bonds and passing culinary knowledge between generations. Kimchi's nutritional and cultural significance runs so deep that it accompanies nearly every Korean meal, that families maintain dedicated kimchi refrigerators built specifically to manage fermentation temperature, and that South Korea has established a national institute devoted entirely to kimchi research and preservation. Far from a static dish, kimchi continues evolving with hundreds of regional and seasonal variations made from radish, cucumber, scallion, and other vegetables beyond napa cabbage alone.
Homemade kimchi connects you to centuries of careful tradition, rewarding patience with a side dish that only gets better with time. Jal meokgesseumnida!
Calculate Portions by Guest Count
Select the number of people you're serving to get precise measurements
Portions for
2 People
400 g total Kimchi
Portions for
4 People
800 g total Kimchi
Portions for
6 People
1200 g total Kimchi
Portions for
8 People
1600 g total Kimchi
Portions for
10 People
2000 g total Kimchi
Portions for
12 People
2400 g total Kimchi
Portions for
15 People
3000 g total Kimchi
Portions for
20 People
4000 g total Kimchi
Portions for
30 People
6000 g total Kimchi
Portions for
50 People
10000 g total Kimchi
Portions for
75 People
15000 g total Kimchi
Portions for
100 People
20000 g total Kimchi
Portions for
200 People
40000 g total Kimchi
Quick Reference Guide
200g
Per Serving
800g
For 4 People
2000g
For 10 People
10kg
For 50 People
Related Categories
Pro Tips
- • Always prepare slightly more than calculated to account for hearty appetites
- • Consider the occasion: formal dinners typically require more precise portions
- • Account for side dishes when planning main course quantities
- • Store leftovers properly to minimize waste and extend freshness