Gourmet Grilled Hamburger
Indulge in the ultimate gourmet experience with our perfectly grilled hamburgers. Juicy, flavorful, and irresistibly delicious!
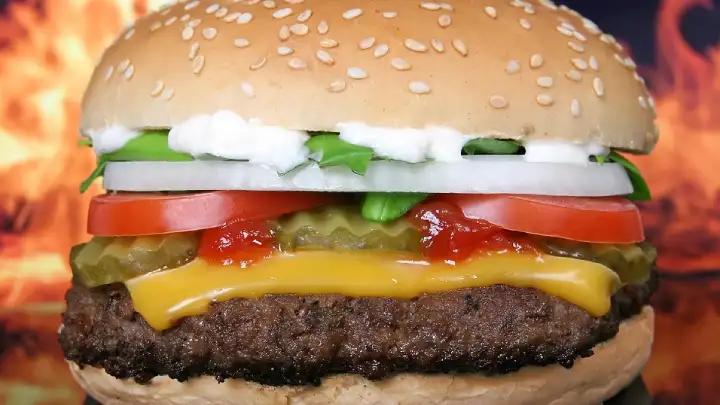
Table of Content
Gourmet Grilled Hamburger
Click here to see more portionsThe hamburger's path to becoming America's defining food began with German immigrants who brought minced-beef preparations like Hamburg steak to the United States in the nineteenth century, where it gradually found its way between two pieces of bread at fairs, lunch counters, and roadside stands. Several American cities and small-town diners claim the honor of serving the first true hamburger sandwich around the turn of the twentieth century, and while no single claim is universally settled, what's clear is that the combination of a grilled beef patty, a soft bun, and simple toppings caught on fast, spreading through diners, drive-ins, and eventually fast-food chains that turned it into a global culinary export. What separates a genuinely great hamburger from an ordinary one comes down to a handful of fundamentals: quality beef with enough fat to stay juicy, a hot enough cooking surface to develop a flavorful crust through the Maillard reaction, restraint in handling the meat so it doesn't turn dense and tough, and a balance of toppings that complement rather than overwhelm the patty itself. The gourmet version elevates these fundamentals further—a buttery brioche bun, well-aged cheddar, and fresh, thoughtfully layered vegetables—while still honoring the burger's essential identity as honest, satisfying, hand-held food. It remains one of the few dishes equally at home at a backyard barbecue and on a white-tablecloth menu.
| Ingredient | Amount |
|---|---|
| For the Patty: | |
| Beef | 150g (80/20 ground chuck, formed into one patty, salted just before grilling) |
| For the Bun & Cheese: | |
| Brioche | 2 pieces (bun halves, lightly toasted) |
| Cheddar | 2 slices (sharp, room temperature for easy melting) |
| For the Toppings: | |
| Onion | 3 slices (thin rings, raw or caramelized) |
| Tomato | 2 slices (ripe, cut just before serving) |
| Lettuce | 2 leaves (crisp, such as iceberg or romaine) |
| Pickles | 3 pieces (dill chips, sliced) |
Instructions:
1. Choose and Handle the Beef:
Start with freshly ground beef at an 80/20 lean-to-fat ratio—this fat content is the sweet spot that keeps a burger juicy without becoming greasy, since fat renders during cooking and bastes the meat from within. Handle the beef as little as possible; overworking ground meat with your hands compresses the fat and protein structure, producing a dense, tough patty instead of one that stays tender and slightly loose in texture. Keep the meat cold until you're ready to shape it, since chilled fat holds its structure better during forming and initial cooking.
2. Form the Patty Loosely:
Gently shape the beef into a patty slightly wider than your bun, since it will shrink somewhat during cooking. Press a shallow dimple into the center of the patty with your thumb—this small indentation counteracts the way burgers naturally puff up in the middle as they cook, helping the patty stay flat rather than doming. Avoid compacting the meat tightly; a loosely formed patty with visible texture cooks up far more tender than one packed dense like a meatball.
3. Season Right Before Cooking:
Salt the patty generously on both sides just before it goes on the grill, not earlier. Salting ground beef well in advance draws out moisture and can give the texture a denser, almost sausage-like quality over time, whereas salting immediately before cooking seasons the surface without affecting the interior structure. Add freshly ground black pepper if desired, but keep additional seasonings minimal—the beef itself should be the star.
4. Preheat the Grill Properly:
Preheat your grill to medium-high heat and let the grates get properly hot before the patty touches them—at least 10 minutes of preheating time. A sufficiently hot surface is what creates a deeply browned, flavorful crust through the Maillard reaction within the first minute of contact, sealing in juices and building flavor that a lukewarm grill simply can't replicate. Lightly oil the grates to prevent sticking.
5. Grill Without Pressing:
Place the patty on the hot grill and resist the urge to press down on it with your spatula—pressing squeezes out the juices that keep the burger moist, leaving you with a drier result. Grill for about 3-4 minutes on the first side without moving it, allowing a proper crust to form. Flip only once, then cook for another 3-4 minutes on the second side, until your desired internal temperature is reached—about 71°C (160°F) for well-done, somewhat lower if you prefer it less cooked through, accounting for food-safety guidance on ground beef.
6. Melt the Cheese at the Right Moment:
About a minute before the patty finishes cooking, lay the cheddar slice directly on top and close the grill lid briefly, or tent the patty loosely with foil, to trap heat and melt the cheese evenly without overcooking the meat underneath. The cheese should turn glossy and just begin to slump over the edges of the patty—this is the visual cue that it's ready and melted through rather than just softened on the surface.
7. Toast the Brioche Buns:
While the patty rests briefly after grilling, place the brioche bun halves cut-side down on the grill for 30-60 seconds, just until lightly golden and slightly crisp at the edges. Toasting the bun isn't just about flavor—it also creates a barrier that helps the bread resist becoming soggy once the juicy patty and toppings are added, keeping the structural integrity of the burger intact through to the last bite.
8. Layer the Toppings Strategically:
Build the burger with intention: a thin spread of condiments on the toasted bottom bun, then the lettuce leaf as a moisture barrier between the bread and the warm patty, followed by the cheese-topped patty itself, then sliced tomato, onion, and pickles on top. This order isn't arbitrary—placing lettuce beneath the hot patty helps protect the bun from sogginess, while toppings layered above the meat stay crisp and distinct rather than wilting under residual heat.
9. Assemble and Serve Immediately:
Cap the burger with the top bun, pressing down gently just enough to help everything hold together without squeezing all the juices out the sides. Serve immediately while the patty is still hot and the cheese is molten—a great burger is very much a race against time, since the textures and temperatures that make it exceptional don't last. A toothpick through the center can help hold tall, well-stacked burgers together for serving.
Kitchen Wisdom & American Grilling Traditions:
- Fat Content Drives Juiciness: An 80/20 beef blend balances flavor and moisture better than leaner cuts, which tend to dry out and turn tough on a hot grill.
- Handle the Meat Minimally: Overworking ground beef compacts its structure and produces a dense, rubbery patty. Shape it just enough to hold together.
- Salt Right Before Cooking: Seasoning too far in advance draws moisture out of the meat. Salt immediately before the patty hits the grill for the best texture.
- Dimple the Center: A shallow thumbprint in the middle of the raw patty counteracts natural puffing during cooking, keeping the burger flat for even contact with the grill and bun.
- Never Press the Patty: Pressing down with a spatula squeezes out flavorful juices. Let the burger cook undisturbed for a properly seared crust and moist interior.
- Toast the Bun: A few seconds on the grill firms up the bread, helping it withstand the juicy patty and toppings without falling apart.
- Layer With Purpose: Placing lettuce directly against the bottom bun protects it from sogginess, while toppings above the patty stay crisp longer.
- Let Cheese Melt Gently: Adding the cheese near the end and covering briefly melts it evenly without overcooking the meat underneath.
- Quality Beef Matters Most: With so few ingredients in a classic burger, the flavor and texture of the beef itself carries the dish—buy the best ground beef you can find.
- Serve Without Delay: A burger's best qualities—hot juicy meat, melted cheese, crisp vegetables—are fleeting. Build and serve it as close to eating time as possible.
American Heritage & Backyard Grilling Culture
The hamburger's roots stretch back to German immigrants who introduced minced beef preparations to American cities in the nineteenth century, but it was the combination of that ground beef with a bread roll—first popularized at fairs, lunch counters, and roadside stands around the turn of the twentieth century—that created the sandwich Americans would eventually claim as uniquely their own. The rise of the automobile and the drive-in restaurant in the early-to-mid twentieth century cemented the hamburger's place in American culture, as did the postwar boom of fast-food chains that standardized and mass-produced it for a nation on the move. Yet alongside that commercial history runs a parallel, equally important tradition: the backyard barbecue, where hand-formed patties grilled over charcoal or gas became a centerpiece of summer gatherings, family cookouts, and national holidays. The gourmet burger movement of recent decades, with its emphasis on quality beef, artisan buns, and thoughtful toppings, represents something of a return to that homemade tradition, elevating a dish that has always carried both working-class practicality and genuine craft. Few foods better capture the contradictions and pleasures of American food culture: humble origins, mass appeal, and endless room for personal and regional reinvention.
A great burger is simpler than it looks—respect the beef, control your heat, and don't overthink the rest. Dig in!
Calculate Portions by Guest Count
Select the number of people you're serving to get precise measurements
Portions for
2 People
400 g total Hamburger
Portions for
4 People
800 g total Hamburger
Portions for
6 People
1200 g total Hamburger
Portions for
8 People
1600 g total Hamburger
Portions for
10 People
2000 g total Hamburger
Portions for
12 People
2400 g total Hamburger
Portions for
15 People
3000 g total Hamburger
Portions for
20 People
4000 g total Hamburger
Portions for
30 People
6000 g total Hamburger
Portions for
50 People
10000 g total Hamburger
Portions for
75 People
15000 g total Hamburger
Portions for
100 People
20000 g total Hamburger
Portions for
200 People
40000 g total Hamburger
Quick Reference Guide
200g
Per Serving
800g
For 4 People
2000g
For 10 People
10kg
For 50 People
Related Categories
Pro Tips
- • Always prepare slightly more than calculated to account for hearty appetites
- • Consider the occasion: formal dinners typically require more precise portions
- • Account for side dishes when planning main course quantities
- • Store leftovers properly to minimize waste and extend freshness