Falafel Servings: Middle Eastern Crispy Chickpea Classic
Calculate perfect portions of authentic Falafel. Master these crispy-outside, fluffy-inside Middle Eastern fritters with herbs, spices, and vibrant flavors!
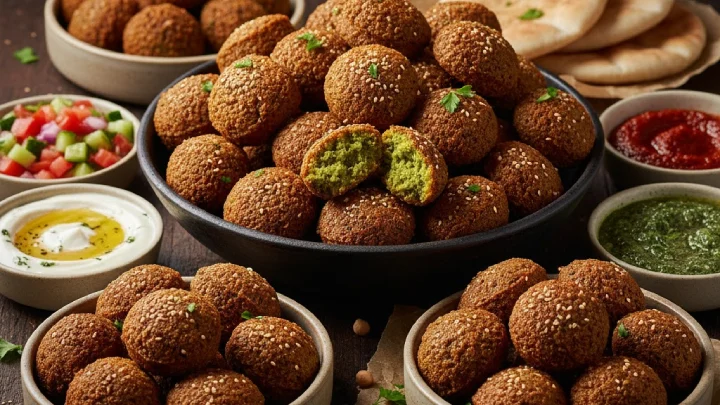
Table of Content
Traditional Middle Eastern Falafel
Click here to see more portionsFalafel stands as the Middle East's most beloved street food and perhaps the world's most successful vegetarian dish—crispy, golden-brown spheres or patties concealing fluffy, herb-flecked interiors bursting with the flavors of chickpeas, fresh herbs, and warming spices. These ancient fritters, claimed by multiple countries as their national treasure, unite the entire Levantine region in their love for this perfect food. Born centuries ago—possibly in Egypt where fava beans were the original base, or the Levant where chickpeas became standard—falafel has transcended borders to become global fast food, yet the best versions remain those found at humble street carts in Tel Aviv, Beirut, Cairo, and Amman, where vendors have spent decades perfecting their particular recipe and frying technique. The magic of falafel lies in its textural contrast: a shattering, deeply browned crust giving way to a light, almost fluffy interior studded with fresh herbs and aromatics. Unlike most fritters, authentic falafel uses dried chickpeas soaked and ground raw—never canned—creating the proper texture and allowing herbs and spices to shine. Tucked into warm pita with tahini sauce, fresh vegetables, pickles, and hot sauce, falafel becomes a complete meal that's satisfying, flavorful, and surprisingly complex despite its humble ingredients. This is peasant food elevated to perfection through technique, tradition, and an understanding that simple ingredients, properly handled, create extraordinary results.
| Ingredient | Amount |
|---|---|
| For the Falafel: | |
| Dried Chickpeas | 500g (MUST be dried, never canned) |
| Fresh Parsley | 100g (leaves and tender stems, roughly chopped) |
| Fresh Cilantro | 80g (leaves and tender stems, roughly chopped) |
| Onion | 150g (roughly chopped) |
| Garlic | 40g (peeled cloves) |
| Cumin Seeds | 12g (toasted and ground, or ground cumin) |
| Coriander Seeds | 10g (toasted and ground, or ground coriander) |
| Black Pepper | 5g (freshly ground) |
| Cayenne Pepper | 3g (adjust for heat preference) |
| Salt | 15g |
| Baking Powder | 8g |
| Baking Soda | 4g |
| All-Purpose Flour | 30g (if needed for binding) |
| Sesame Seeds | 40g (optional, for coating) |
| Vegetable Oil | 1000ml (for deep frying) |
| For the Tahini Sauce: | |
| Tahini | 200g (pure sesame paste) |
| Lemon Juice | 80ml (fresh) |
| Garlic | 10g (minced or crushed) |
| Salt | 5g (to taste) |
| For Serving: | |
| Pita Bread | 400g (6-8 large pitas, warmed) |
| Tomatoes | 250g (diced) |
| Cucumber | 200g (diced) |
| Lettuce | 150g (shredded) |
| Red Onion | 100g (thinly sliced) |
| Pickles | 120g (turnips, cucumbers, or mixed pickles) |
| Greek Yogurt | 150g (optional, for additional sauce) |
| Hot Sauce | 40ml (harissa or schug) |
| Olive Oil | 60ml (for drizzling) |
| Sumac | 5g (for sprinkling) |
| Za'atar | 10g (optional, for sprinkling) |
Instructions:
1. Soak the Chickpeas Properly (Critical Step):
This is where most falafel recipes go wrong, so pay close attention: you MUST use dried chickpeas, never canned. Canned chickpeas are already cooked and too soft, resulting in mushy, dense falafel that falls apart during frying. Measure out 500g of dried chickpeas and inspect them, removing any debris or broken pieces. Place in a large bowl and cover with cold water by at least 10cm—chickpeas will triple in volume as they soak. Soak for 18-24 hours at room temperature, changing the water once halfway through if convenient. The chickpeas should swell significantly and become almost double their original size, but remain quite firm—they should feel like raw nuts, not soft like cooked beans. You should be able to bite one but it requires effort; if they're easily chewable, they've soaked too long. After soaking, drain thoroughly in a colander and spread on a clean kitchen towel to remove surface moisture—excess water is the enemy of crispy falafel. The properly soaked chickpeas should smell clean and slightly sweet, feel firm with some give, and be ready to grind into that perfect falafel texture. This overnight soaking is non-negotiable and cannot be rushed—it's the foundation of authentic falafel.
2. Prepare Fresh Herbs and Aromatics:
The abundance of fresh herbs is what makes Middle Eastern falafel so vibrant and flavorful compared to Western imitations. Wash the parsley and cilantro thoroughly, then dry completely—wet herbs add moisture that makes falafel soggy and prone to breaking during frying. You can use a salad spinner or pat dry with kitchen towels. Remove any tough stems from the parsley and cilantro, but keep the tender stems—they contain lots of flavor and help bind the mixture. Roughly chop the herbs; they don't need to be fine at this stage. Peel and roughly chop the onion into chunks. Peel the garlic cloves. If using whole cumin and coriander seeds, toast them in a dry pan over medium heat for 2-3 minutes until fragrant, then grind in a spice grinder or mortar and pestle—freshly ground spices make a noticeable difference, though pre-ground works if that's what you have. Have all these ingredients ready before you start processing, as you'll need to work relatively quickly once you begin grinding the chickpeas.
3. Grind to Perfect Texture:
This step determines whether your falafel will be light and fluffy or dense and heavy. In a food processor fitted with the metal blade, add the drained chickpeas, chopped herbs (parsley and cilantro), chopped onion, garlic, ground cumin, ground coriander, black pepper, cayenne, and salt. DO NOT add the baking powder, baking soda, or flour yet—those come later. Pulse the food processor in 1-2 second bursts, scraping down the sides frequently. This isn't a quick process; it takes 2-3 minutes of pulsing to achieve the right consistency. You're aiming for a coarse meal texture—like coarse breadcrumbs or very coarse bulgur—NOT a smooth paste or hummus-like puree. The mixture should hold together when squeezed but still have visible texture with tiny chickpea pieces throughout. If you can see individual herb flecks, that's perfect. The mixture should look pebbly and feel slightly moist but not wet or pasty. Stop before it becomes smooth; over-processing creates dense, heavy falafel. Transfer the mixture to a bowl, cover, and refrigerate for at least 1 hour or up to 24 hours—this rest allows flavors to meld and the mixture to firm up, making shaping much easier.
4. Add Leavening and Test Consistency:
After the mixture has rested and chilled, remove from refrigerator. Add the baking powder and baking soda—these are crucial for creating light, fluffy interiors with that characteristic slightly airy texture. Mix them in thoroughly with your hands or a spoon. Now test the consistency: take a small handful and squeeze firmly. It should hold together in a compact ball without crumbling apart, but it shouldn't feel wet or mushy. If the mixture is too dry and falls apart, add flour one tablespoon at a time until it just holds together—but be cautious; too much flour makes heavy, dense falafel. If too wet (this happens if chickpeas weren't drained well or herbs were wet), add flour a little at a time until corrected. The mixture should feel firm, slightly tacky, and hold its shape when formed. Fry one test falafel: form a small patty, fry in 180°C oil for 3-4 minutes, and check—it should hold together, be crispy outside, fluffy inside, well-seasoned, and not greasy. Adjust seasoning in the main mixture if needed. This test falafel is worth the effort; it prevents disappointment when frying the entire batch.
5. Shape with Tradition and Technique:
Traditional falafel shape varies by region: Egyptian ta'ameya are often flatter patties; Lebanese and Syrian falafel are perfect spheres; Israeli falafel are slightly flattened balls. The classic tool is a special falafel scoop with a lever that forms and releases perfect portions, but you can shape by hand. For spheres: take about 2 tablespoons of mixture, roll between your palms to form a ball about 4cm in diameter—compact it firmly so it won't fall apart during frying. For flatter patties: form balls then gently press to create thick discs about 5cm wide and 2cm thick. Work with slightly damp hands to prevent sticking, but don't make the mixture wet. If desired, roll each falafel in sesame seeds for extra crunch and nutty flavor—this is traditional in some regions. Arrange shaped falafel on a parchment-lined tray without touching—they can be refrigerated for up to 2 hours before frying, or frozen for up to 2 months (fry directly from frozen, adding 2 minutes to cooking time). Consistent size and shape ensure even cooking, so take time to make them uniform. You should get about 24-28 falafel depending on size.
6. Master the Deep-Frying Technique:
Pour vegetable oil into a deep, heavy pot or deep fryer to a depth of at least 8cm. Heat to 180°C (350°F)—this temperature is crucial for perfect falafel. Use a thermometer for accuracy. Too hot (above 190°C) and the exterior burns before the interior cooks; too cool (below 170°C) and falafel absorb oil and become greasy instead of crispy. Test temperature by dropping a small piece of the mixture into oil—it should sizzle immediately and rise to the surface within a few seconds. Have a spider strainer or slotted spoon ready, and prepare a wire rack set over a baking sheet lined with paper towels. Carefully lower 5-6 falafel into the hot oil—don't overcrowd as this drops the temperature. They should sink briefly then float to the surface, sizzling vigorously. Fry for 5-7 minutes total, turning occasionally for even browning, until deep golden brown all over—not pale golden, but a rich, dark mahogany-brown that indicates proper caramelization and crispiness. The falafel should sound hollow when tapped and feel light for their size. Remove to the wire rack to drain—the elevated position keeps them crispy. Let oil return to temperature between batches. Properly fried falafel should be deeply colored, extremely crispy on the outside, and when broken open, reveal a fluffy, light green interior with visible herb flecks—never dense or doughy.
7. Create Classic Tahini Sauce:
No falafel is complete without rich, creamy tahini sauce—this is absolutely essential and non-negotiable. In a bowl, place the tahini (make sure it's well-stirred as oil separates on top). Add the minced or crushed garlic and salt. Start adding lemon juice gradually while whisking constantly—here's where the magic happens: the tahini will initially seize up and become very thick, almost paste-like. Don't panic; this is normal. Continue whisking and gradually add ice-cold water, about 2-3 tablespoons at a time. The sauce will suddenly transform, becoming smooth, creamy, and lighter in color—almost white or pale beige. Continue adding water until you achieve a pourable but still thick consistency, like heavy cream or thin yogurt. You'll likely use about 120-180ml of water total, depending on your tahini's thickness. The sauce should coat the back of a spoon but still drizzle smoothly. Taste and adjust: it should be tangy from lemon, garlicky, well-salted, and taste strongly of sesame with creamy richness. If too thick, add more water; if too thin, add more tahini; if bland, add more lemon juice and salt; if too garlicky, add more tahini and lemon. Let the sauce sit for 10 minutes to allow flavors to meld—it may thicken slightly; thin with water if needed. Good tahini sauce should be so delicious you could eat it with a spoon.
8. Prepare the Fresh Accompaniments:
While falafel are draining, prepare your pita sandwiches' components. Warm the pita bread—wrap in foil and heat in a 180°C oven for 5-7 minutes, or heat directly over a gas flame or in a hot pan for 30 seconds per side until soft, pliable, and slightly puffed. Keep warm wrapped in a clean kitchen towel. Dice the tomatoes into small cubes, removing seeds if they're very juicy—excess moisture makes sandwiches soggy. Dice the cucumber similarly. Shred the lettuce finely. Slice the red onion paper-thin—if it's very pungent, soak in cold water for 10 minutes, then drain and pat dry to mellow the sharpness. Drain and chop any pickles—traditional Middle Eastern pickled turnips (the bright pink ones) are classic, but pickled cucumbers work beautifully too. Arrange all components in bowls for easy assembly. If using hot sauce like harissa (North African chili paste) or schug (Yemeni green hot sauce), have those ready. Some like to mix yogurt with a bit of tahini for extra creaminess. Have the olive oil ready for drizzling, and the sumac and za'atar for final flourishes. This mise en place makes serving a crowd much easier and allows everyone to customize their sandwiches.
9. Assemble and Serve Street-Food Style:
Now comes the best part—building the perfect falafel sandwich. Cut or tear open the top third of a warm pita to create a deep pocket. Spread a generous amount of tahini sauce inside the pocket—be generous; this isn't the time for moderation. Add a small handful of shredded lettuce to create a base layer. Tuck in 4-5 hot falafel—they should still be warm and crispy. Add diced tomatoes, cucumbers, pickles, and red onion slices. Drizzle more tahini sauce over everything—seriously, use lots of tahini. Add a few drops of hot sauce if desired. Sprinkle with sumac for tangy, citrusy notes and visual appeal. Optionally add a dollop of yogurt. Drizzle with good olive oil. Some like to add a sprinkle of za'atar for extra herbal, sesame notes. Fold the bottom of the pita up to catch drips and wrap in paper or foil for easier eating. Serve immediately while falafel are hot and crispy—falafel are best eaten within minutes of frying when the textural contrast between crackling exterior and fluffy interior is at its peak. Alternatively, serve falafel on a platter with pita, sauces, and vegetables on the side, allowing everyone to build their own. Either way, the experience should be messy, satisfying, and utterly delicious—this is street food that's meant to be eaten enthusiastically with tahini dripping down your hands and the crunch of fresh vegetables mixing with crispy falafel. This is falafel perfection.
Street Vendor Secrets & Levantine Wisdom:
- Dried Chickpeas Are Mandatory: This cannot be stressed enough—canned chickpeas will NEVER produce authentic falafel. They're too soft and wet, resulting in mushy patties that fall apart. Only dried chickpeas, properly soaked, create the correct texture. This is the #1 mistake home cooks make.
- Don't Over-Process: The mixture should remain coarse and pebbly, never smooth like hummus. Over-processing creates dense, heavy falafel. Pulse in short bursts and stop when it just holds together—you should still see texture and tiny chickpea pieces.
- The Resting Period Matters: Chilling the mixture for at least 1 hour (or overnight) firms it up significantly, making shaping easier and allowing flavors to develop. This step also helps the mixture bind better, reducing breakage during frying.
- Temperature is Everything: 180°C (350°F) is the sweet spot. Use a thermometer and maintain consistent temperature between batches. This temperature creates maximum crispiness while cooking the interior perfectly without greasiness.
- The Herb Ratio: Traditional falafel should be vibrantly green inside from abundant fresh herbs. Don't skimp—the herbs aren't just flavoring; they're a main ingredient. The 100g parsley and 80g cilantro create authentic flavor and color.
- Baking Powder Secret: Adding baking powder and baking soda just before shaping (not during initial grinding) creates lighter, fluffier interiors. Add them after the resting period for best results—adding too early can cause premature reaction.
- The Color Test: Properly fried falafel should be deep golden-brown, almost mahogany—not pale. The dark color indicates sufficient caramelization and crispiness. Pale falafel are undercooked or fried at too low temperature.
- Fava Bean Alternative: Egyptian ta'ameya uses fava beans (broad beans) instead of chickpeas, creating a slightly different texture and flavor. Use the same soaking and processing method if you want to try this variation.
- Make-Ahead Excellence: Shaped, unfried falafel freeze beautifully for up to 2 months. Freeze on a tray until solid, then transfer to freezer bags. Fry directly from frozen, adding 2 minutes to cooking time—perfect for quick meals.
- The Tahini Transformation: When tahini seizes up after adding lemon juice, don't add more tahini to fix it—add water. The seized mixture will magically smooth out into creamy sauce. This counterintuitive step confuses many first-time makers.
Ancient Origins & Modern Street Food Culture
Falafel's precise origins remain disputed, with Egypt, Palestine, Lebanon, and Syria all claiming invention. The most accepted theory suggests falafel originated in Egypt over 1,000 years ago as ta'ameya made from fava beans, eaten by Coptic Christians during Lent as a protein-rich meat substitute. The dish spread throughout the Levant, where chickpeas gradually replaced or supplemented fava beans, and fresh herbs became more prominent. Palestinian and Lebanese vendors perfected the street food format in the early 20th century—hot falafel tucked into pita with tahini sauce and vegetables, sold from small carts and storefronts. When Middle Eastern immigrants spread globally in the late 20th century, they brought falafel with them, and it became one of the first widely accepted vegetarian fast foods in the West. Today, you'll find falafel vendors from Tel Aviv to Berlin to New York, each claiming authenticity while adapting to local tastes. Despite global popularity, the best falafel remains in the Middle East at small, dedicated shops where vendors have perfected their recipes over decades—tiny storefronts where falafel are fried to order in huge vats of bubbling oil, served piping hot with generous tahini, and eaten standing at tiny counters or wrapped in paper for street eating. Falafel represents more than food—it's cultural identity, a symbol of Palestinian heritage, Israeli street food culture, vegetarian sustenance, and the universal appeal of something simple done extraordinarily well.
These golden spheres of crispy perfection prove that humble ingredients—chickpeas, herbs, and spices—transformed through proper technique create extraordinary food. Each crunchy bite celebrates centuries of Middle Eastern culinary wisdom and the joy of honest, flavorful vegetarian cooking. Sahtein! (To your health!)
Calculate Portions by Guest Count
Select the number of people you're serving to get precise measurements
Portions for
2 People
640 g total Falafel
Portions for
4 People
1280 g total Falafel
Portions for
6 People
1920 g total Falafel
Portions for
8 People
2560 g total Falafel
Portions for
10 People
3200 g total Falafel
Portions for
12 People
3840 g total Falafel
Portions for
15 People
4800 g total Falafel
Portions for
20 People
6400 g total Falafel
Portions for
30 People
9600 g total Falafel
Portions for
50 People
16000 g total Falafel
Portions for
75 People
24000 g total Falafel
Portions for
100 People
32000 g total Falafel
Portions for
200 People
64000 g total Falafel
Quick Reference Guide
320g
Per Serving
1280g
For 4 People
3200g
For 10 People
16kg
For 50 People
Related Categories
Pro Tips
- • Always prepare slightly more than calculated to account for hearty appetites
- • Consider the occasion: formal dinners typically require more precise portions
- • Account for side dishes when planning main course quantities
- • Store leftovers properly to minimize waste and extend freshness